

How to Sharpen Dog Clipper Blades at Home: DIY Guide
Table of Contents
- Signs Your Dog Clipper Blades Are Dull
- Tools and Equipment You Need to Sharpen Dog Clipper Blades
- Best Sharpening Stones for Clipper Blades
- How to Sharpen Dog Clipper Blades at Home: Step-by-Step
- How to Clean and Oil Dog Clippers After Sharpening
- Common Mistakes That Ruin Clipper Blades
- When to Sharpen vs. Replace Your Clipper Blades
- Frequently Asked Questions
Last Updated: October 2, 2026
Signs Your Dog Clipper Blades Are Dull
Before you touch a sharpening stone, confirm the blade is actually dull. A large share of "dull blade" complaints turn out to be a tension problem, packed hair, or a misaligned cutter, all of which are fixed in minutes without removing any metal. Sharpening a blade that didn't need it wears down the teeth for no reason.
Run the Three-Point Diagnostic First
Work through these checks in order. Stop as soon as one explains the symptom.
**1.
What Actual Dullness Looks Like
If the three checks above come back clean, the edge is the likely culprit. Genuine dullness shows up as:
- The clipper pulls or tugs the coat instead of gliding through it, and your dog flinches or pulls away
- You have to make two or three passes over the same strip to get a clean cut
- The blade snags and leaves uneven patches or visible track lines
- The motor labors or whines at a higher pitch because it is fighting resistance
- The blade heats up faster than usual because friction has increased
- Hair packs between the teeth instead of falling away cleanly
How Often to Sharpen
Most home groomers should sharpen every 6 to 12 months, based on guidance from Leading Edge Sharpening. Heavy use, multiple dogs, thick coats, or weekly full grooms, pushes that toward the short end. Professional groomers who clip all day typically rotate blades and sharpen far more often.
The Paper Test
Run the assembled blade across a sheet of printer paper with the clipper off. A sharp blade slices a clean curl. A dull blade snags, tears, or skips. This is the fastest confirmation that the edge, not tension or buildup, is the problem.
Tools and Equipment You Need to Sharpen Dog Clipper Blades
The right setup is simple: a flat sharpening surface, a way to hold the blade steady, and a clean workspace. Skip the fancy gear until you know the basics.
Sharpening Stones and Kits
You need a flat stone and a light oil or water to lubricate it. Diamond plates and ceramic stones hold their flatness longer than cheap whetstones. A knife sharpening kit that costs around $19.00 can handle clipper blades, per the same blade maintenance video.
Safety Gear and Workspace Setup
Set up before you start:
- Safety glasses to block metal shavings
- A non-slip mat under your stone
- Good lighting so you can see the edge
- A small brush for clearing hair and grit
- Blade oil and a clean cloth
Keep the workspace dry and free of pet hair. Loose hair traps grit that scratches the blade face.
Best Sharpening Stones for Clipper Blades
Flatness decides everything when you sharpen dog clipper blades. A stone that dips in the middle grinds uneven edges and ruins blade tension.
Here's how the main stone types compare:
| Stone Type | Grit Range | Best For | Watch Out For |
|---|---|---|---|
| Diamond plate | 300-1200 | Keeping flatness | Wears out over time |
| Ceramic stone | 1000-8000 | Fine honing | Can crack if dropped |
| Water stone | 1000-6000 | Sharp edges | Needs soaking, wears fast |
| Oil stone | 400-1000 | Beginners | Can dish out quickly |
How to Sharpen Dog Clipper Blades at Home: Step-by-Step
Budget about 20 minutes per blade once you have practiced. The whole job lives or dies on two things: keeping the blade dead flat on the stone, and holding a consistent bevel angle. Rush either one and you will round the teeth.
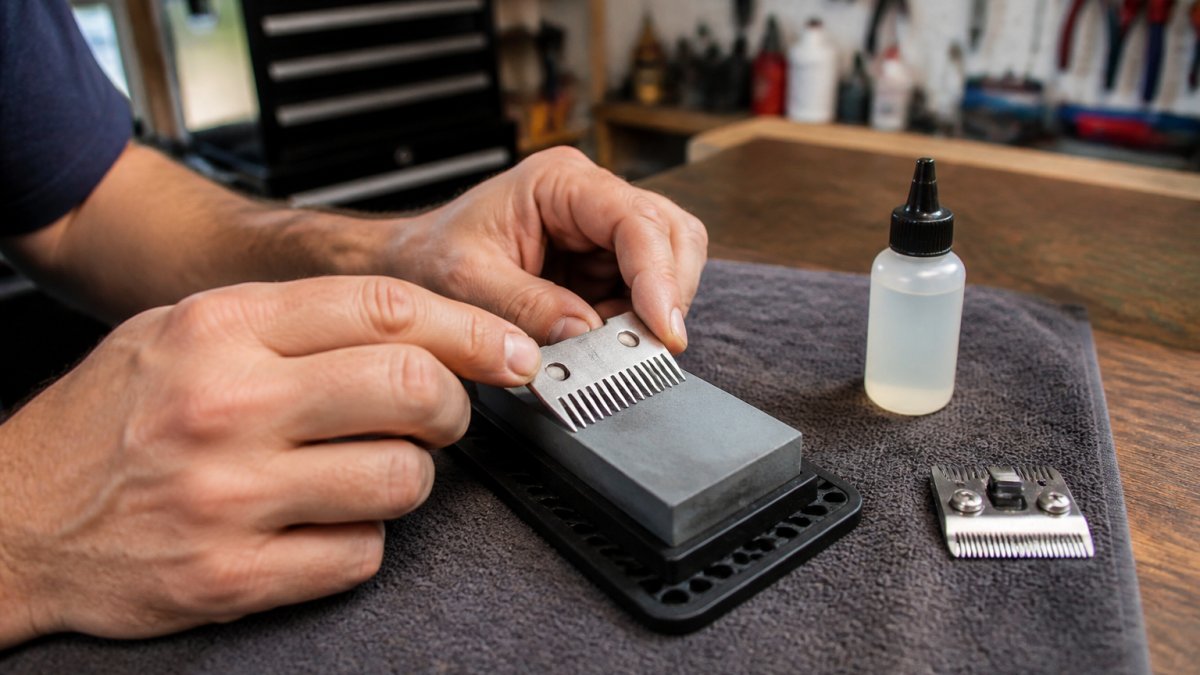
Step 1: Disassemble and Inspect the Blade
Remove the blade from the clipper and separate the cutter (top piece) from the comb (bottom piece). On most detachable A5-style blades the two halves lift apart once the tension is released.
Inspect before you grind:
Height-Adjustable Pet Grooming Table →
- Chips or nicks in the teeth, replace the blade, do not sharpen
- Rust on the flat face, light surface rust can be removed, pitting cannot
- Bent or misaligned teeth, replace
- Worn drive tip or socket, replace; the blade will not seat properly no matter how sharp the edge is
- Cracks anywhere in the metal, replace immediately
Step 2: Hone the Cutting Edge
Lay the comb flat on the stone with the beveled cutting face up. The bevel is the angled strip of metal behind the teeth, that is the only surface you are working.
- Angle: match the existing bevel, which on most clipper blades sits around 30 degrees. Do not invent a new angle; you are restoring the one the factory cut.
- Stroke direction: push the blade forward along the stone in smooth, even strokes, teeth leading. Pulling back with pressure can roll the edge.
- Pressure: light. Let the abrasive do the work. Heavy pressure overheats the thin teeth and can draw the temper out of the steel.
- Passes: 10 to 15 per side, then check. More passes is not better, you are removing metal you cannot put back.
- Lubrication: keep the stone wet with oil or water depending on the stone type. A dry stone clogs and stops cutting.
Step 3: Remove the Burr
Honing raises a thin lip of metal, the burr, on the back side of the edge. If you skip this, the blade will feel sharp but cut rough and dull again within a few sessions.
Step 4: Clean, Oil, and Reassemble
Wipe both halves clean with a cloth and a drop of blade oil. Any grit left on the mating surfaces will grind the blade the moment you turn the clipper on.
Step 5: Test Before You Groom
Do not put a freshly sharpened blade on a dog until you have tested it:
- Paper test: with the clipper off, draw the blade across a sheet of printer paper. It should slice a clean curl with no snagging.
- Sound test: with the clipper on, the motor should run at a steady pitch with no laboring or rattling.
- Heat test: run it for 30 seconds. A blade that gets hot fast is either over-tensioned or still dull.
How to Clean and Oil Dog Clippers After Sharpening
Cleaning after sharpening keeps your tools working longer. Hair buildup and old oil trap grit that dulls the edge fast.
Follow this routine:
- Brush out loose hair from the blade and housing
- Wipe the blade with a soft cloth
- Add 2 to 3 drops of blade oil along the teeth
- Run the clipper for 10 seconds to spread the oil
- Store the blade in a dry case
Common Mistakes That Ruin Clipper Blades
The biggest mistake is sharpening at the wrong angle. Too steep and you grind away the edge. Too shallow and you never reach the cutting surface.
Other mistakes to avoid:
- Using a dished stone that rounds the edge
- Pressing too hard and overheating the metal
- Skipping burr removal, which leaves a rough edge
- Sharpening a blade with bent or chipped teeth
- Forgetting to oil after every use
When to Sharpen vs. Replace Your Clipper Blades
Sharpen when the edge is dull but the metal is sound. Replace when the blade has chips, cracks, rust, or worn drive tips.
Frequently Asked Questions
How often should dog clipper blades be sharpened?
For home groomers, sharpening every 6 to 12 months is a reasonable interval, according to Leading Edge Sharpening. If you groom multiple dogs or have thick-coated breeds, you may need to sharpen more often. Watch for increased heat, pulling, or uneven cuts, which signal it's time. Cleaning and oiling after every use helps extend that window and keeps blades cutting smoothly between sharpenings.
Is it safe to sharpen clipper blades yourself?
It can be safe if you follow proper technique and use the right tools. The critical factor is maintaining blade flatness, since uneven surfaces can ruin tension and cutting ability, according to Tormek Forum discussions. Experts on r/doggrooming caution that without training, DIY attempts can damage blades or harm the animal. Start with a spare blade, work slowly, and stop if you're unsure. A professional sharpening service is always a valid backup.
What can I use to sharpen my clipper blades at home?
A knife sharpening kit with a flat bench stone works for many home groomers. One demonstration showed 18 dog clipper blades sharpened using a single kit costing about $19.00. Look for a fine-grit stone and a flat surface. Avoid pull-through sharpeners or grinding wheels, which remove too much metal and can warp the blade. Always lubricate the stone and keep the blade flat against it during honing.
Can you get dog clipper blades sharpened professionally?
Yes, professional sharpening services exist, but access varies by area. Community discussions in grooming forums highlight the lack of local professional sharpeners as a primary reason pet owners try DIY methods. If you have a reliable service nearby, it's a good option for heavily worn blades. For routine maintenance between professional sharpenings, learning how to sharpen dog clipper blades at home can save time and money.
Dull blades turn a simple trim into a stressful ordeal for you and your dog. With the right stone, a steady hand, and a little practice, you can keep every blade sharp and ready.
Pets R Smarter makes this easier with expert-approved grooming tools, a hassle-free shopping experience, and our Tail Satisfaction Guarantee. Get started with Pets R Smarter and give your dog the calm, comfortable grooming sessions they deserve.