

Safe Dog Nail Care Routine: A Step-by-Step Guide
Table of Contents
- Why a Safe Dog Nail Care Routine Matters
- How Often to Trim Your Dog's Nails
- Best Dog Nail Clippers for Beginners
- How to Desensitize Your Dog to Nail Trimming
- Step-by-Step Safe Nail Trimming Process
- How to Stop Dog Nail Bleeding and Handle Mistakes
- Post-Trim Maintenance and Monitoring
- Common Mistakes to Avoid
Last Updated: August 18, 2026
Why a Safe Dog Nail Care Routine Matters
Overgrown nails aren't just cosmetic. When nails extend two millimeters beyond the paw pad, they alter the knee joint angle, contributing to orthopedic problems and chronic pain. According to the Royal Veterinary College, overgrown and ingrown nails represent 12.66% of all clinical reasons for veterinary visits related to nail care. The ASPCA reports that nail neglect plays a significant role in grooming-related health issues, documenting cases like a Dachshund whose nail curled into the paw pad, requiring surgical removal at nearly $1,000.
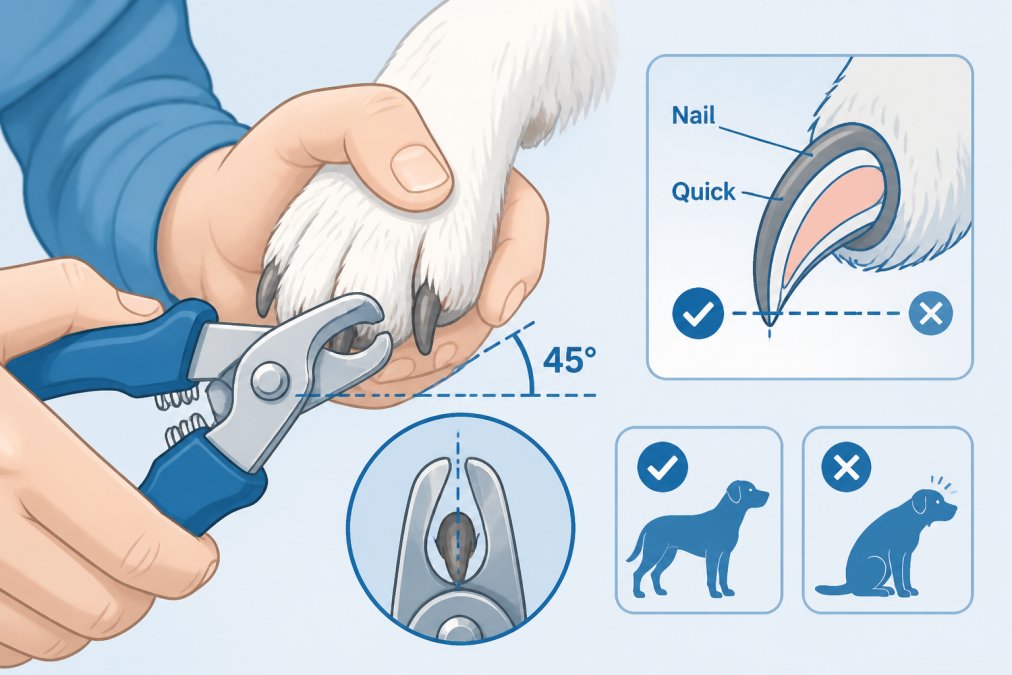
At Pets R Smarter, we understand that nail care is essential preventive health care. With the right approach, technique, and tools, you can safely trim your dog's nails at home while building positive associations with grooming.
How Often to Trim Your Dog's Nails
Most dogs need their nails trimmed every 3-4 weeks, though this varies by breed, activity level, and growth rate. Dogs spending time on hard surfaces like concrete wear down nails faster and may need less frequent trimming. The simplest indicator: if you hear clicking on hardwood floors, they're overdue. When standing, nails should not touch the ground.
According to the Royal Veterinary College's analysis of over 2 million dogs, Chihuahuas and Beagles showed significantly higher trimming needs than larger breeds. Small breeds benefit from a consistent 2-3 week schedule.
Best Dog Nail Clippers for Beginners
Choosing the right tool makes the difference between a quick, safe trim and a stressful struggle.
Scissor-style clippers are intuitive for first-time users, offering immediate feedback and instantaneous cuts that appeal to anxious dogs.
Rotary grinders use a spinning head to gradually file nails, taking 15-30 seconds per nail versus 2-3 seconds for clippers. They provide more control and are gentler on nail structure, reducing splintering risk.
Clippers vs. Grinders: Which Is Right for You
The choice depends on your dog's anxiety level and your confidence. Grinders' slower operation suits easily startled dogs, though the vibration and humming sound may initially unsettle noise-sensitive dogs. Scissor clippers require precise technique to avoid cutting the quick but offer speed and simplicity.
Grinders naturally slow you down and make it harder to cut too deep, making them technically safer for beginners despite requiring more time per nail. Many experienced handlers keep both tools: grinders for anxious dogs and clippers for those tolerating quick handling.
At Pets R Smarter, we recommend starting with whichever tool matches your dog's temperament, then potentially adding the other as your confidence grows.
How to Desensitize Your Dog to Nail Trimming
Fear during nail trims often stems from lack of exposure. A 2022 ASPCA study found that 45% of pet owners cited fear of hurting their pet as a barrier to grooming at home, but nail trimming demonstrations significantly increased confidence.
Desensitization works by breaking the process into tiny, manageable steps and pairing each with high-value rewards. This counter-conditioning teaches your dog that grooming tools and paw handling predict treats and praise, not pain.
Start by showing your dog the clippers without turning it on, rewarding calm behavior. Progress to letting them smell the tool, touching their paw with it (off), turning it on nearby, then finally trimming one nail. Each session should last 5-10 minutes and end positively.
Step-by-Step Safe Nail Trimming Process
Once your dog is desensitized, the actual trimming follows a clear, methodical process. Safety depends on understanding nail anatomy, proper positioning, and controlled technique.
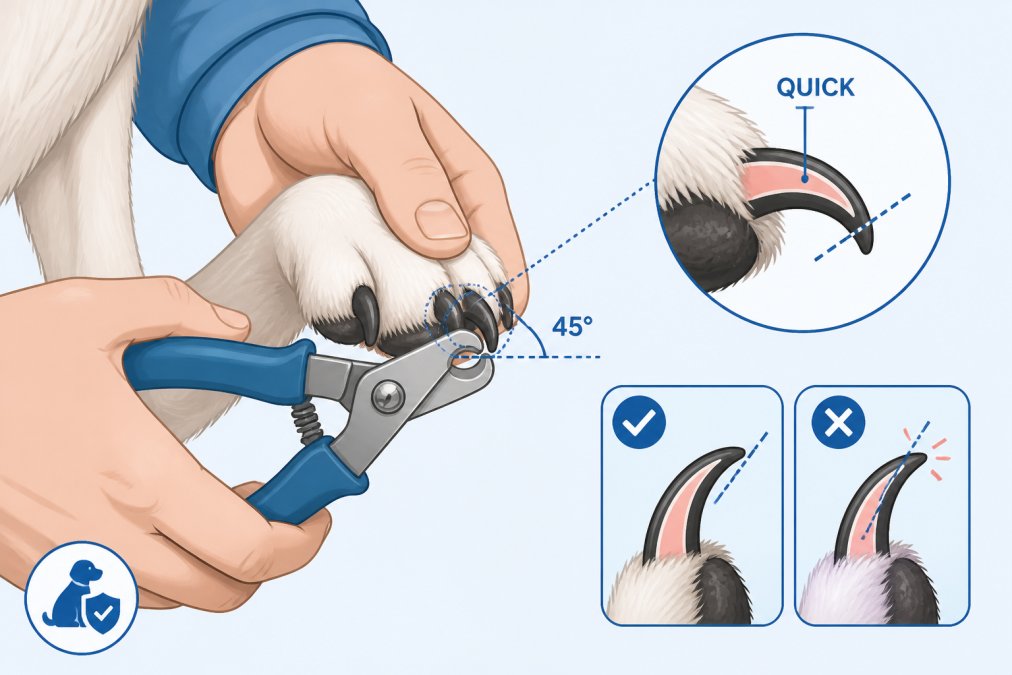
Step 1: Secure Proper Positioning
Position your dog lying down on their side or sitting comfortably. Never trim while standing; you need stability and full visibility. Have a helper gently hold the paw steady without squeezing.
Step 2: Examine the Nail Structure
Look at the nail from the side and bottom for two distinct zones: the outer keratin (hard, translucent part) and the inner vascular core (the quick). The quick appears as a darker dot inside the nail when viewed from the bottom.
Step 3: Identify the Quick
This critical safety step determines your cutting point. Spend time here; rushing causes accidents.
Step 4: Position Your Clippers
Hold clippers perpendicular to the nail. Position the blade to cut just in front of the quick, leaving roughly 2-3 millimeters of nail beyond it. For light-colored nails, you see the quick clearly. For dark nails, trim conservatively.
Step 5: Make One Clean Cut
Squeeze firmly in one smooth motion. Hesitation creates splintering and pain. One decisive cut is far better than multiple attempts. With a grinder, apply gentle pressure for 10-15 seconds per nail, checking frequently.
Step 6: Check for Bleeding
If you see a small dot of blood, you've nicked the quick. Immediately apply styptic powder to stop bleeding.
Step 7: Move to the Next Nail
Trim all four nails on one paw before moving to the next. Don't miss dewclaws (small nails on inner front legs), which often need more frequent trimming.
Identifying the Quick
The quick is the blood vessel and nerve ending inside the nail. Cutting into it causes bleeding and pain.
For light-colored nails: The quick appears as a dark dot or small circle in the center when viewed from the bottom. This is your visual boundary; trim just in front of it.
For dark nails: You cannot see the quick visually. Look at the bottom as you trim. A small dark dot appears in the center as you approach the quick. Stop when you see this mark; you've reached the quick's outer edge. Back up slightly and make your final cut just in front.
The conservative approach: If uncertain, trim less. You can always trim more in a few weeks. You cannot undo a cut quick.
The Trimming Technique
For scissor clippers: Hold clippers perpendicular to the nail. Position roughly 2-3 millimeters of nail extending past the blade. Squeeze firmly and smoothly in one motion. Hesitation causes splintering.
For grinders: Hold at roughly 45 degrees to the nail. Apply gentle, steady pressure without forcing. Move slowly along the nail edge, checking frequently. Pause between nails to let the grinder cool.
Both techniques require practice. By your fifth or sixth trim, the motion becomes natural.
How to Stop Dog Nail Bleeding and Handle Mistakes
Cutting the quick happens to experienced groomers. What matters is knowing how to respond.
Immediate response: Stay calm; your dog will mirror your anxiety. Apply styptic powder directly to the bleeding nail. If unavailable, cornstarch works temporarily. Press the powder onto the nail for 30-60 seconds. Bleeding typically stops within 1-2 minutes.
Post-trim monitoring: Watch the nail for 24 hours. If bleeding resumes, reapply styptic powder. Contact your veterinarian if you see signs of infection (swelling, discharge, or limping).
Preventing future mistakes: Review the quick identification section. Most repeated mistakes happen from rushing identification. Slow down, look carefully, and trim conservatively.
Post-Trim Maintenance and Monitoring
Immediate post-trim (first 24 hours): Keep paws dry. Avoid bathing or prolonged water exposure for at least 12 hours.
Week one: Monitor nails daily for swelling, discharge, or excessive licking. Contact your veterinarian if you notice these signs.
Ongoing maintenance: Encourage walking on rough surfaces like concrete or gravel to naturally wear nails. A scratch board can reduce trimming frequency by 20-30% when used consistently. Track trimming dates to anticipate future appointments.
Common Mistakes to Avoid
Mistake 1: Trimming too much at once. Removing too much increases quick-hitting risk and creates structurally weak nails. Trim conservatively.
Mistake 2: Using dull clippers. Dull clippers crush rather than cut cleanly, causing splintering and pain. Replace clippers every 1-2 years.
Mistake 3: Skipping the dewclaws. These small inner front leg nails don't touch the ground and wear slowly. They often grow faster and can curl into the paw pad if neglected.
Mistake 4: Rushing desensitization. Pushing fearful dogs before they're ready creates lasting negative associations. Take time upfront to build positive associations.
Mistake 5: Ignoring signs of discomfort. If your dog pulls away or yelps, stop immediately. Forcing teaches fear and resistance.
Mistake 6: Using wrong positioning. Trimming a standing dog is exponentially harder than a lying dog. Position matters for stability, visibility, and your dog's security.
A safe dog nail care routine is built on three foundations: understanding anatomy (the quick), mastering technique (proper positioning and cutting), and prioritizing your dog's emotional comfort through desensitization. The upfront investment in training and going slowly prevents months of stress and potential injury.
Pets R Smarter offers premium grooming tools specifically selected for beginners and anxious dogs, backed by our Tail Satisfaction Guarantee. Whether you choose scissor clippers or a grinder, starting with a quality tool designed for safety and comfort makes the entire process easier. Explore our curated collection of nail care tools and find the right fit for your dog's temperament and your grooming confidence level.
Frequently Asked Questions
How often should I trim my dog's nails?
Most dogs need nail trimming every 3 to 4 weeks, though frequency depends on your dog's activity level and how quickly their nails grow. Dogs that spend more time indoors or on soft surfaces need more frequent trims than active dogs on rough terrain. Check your dog's nails monthly, if they touch the ground when your dog stands, it's time for a trim. Some breeds, like Chihuahuas and Beagles, may need more frequent attention.
What's the best way to identify the quick when trimming nails?
The quick is the blood vessel and nerve ending inside the nail. In light-colored nails, you'll see a dark circle or oval in the center, that's the quick. For dark nails, trim small amounts at a time and stop when you see a small dark dot in the center of the nail. This signals you're close. Never trim past that point. When in doubt, trim conservatively, it's easier to trim more later than to treat a bleeding nail.
What should I do if I accidentally cut the quick?
Stay calm; minor bleeding stops quickly. Apply styptic powder or cornstarch directly to the nail and hold pressure for 30 seconds to a minute. If you don't have styptic powder, cornstarch works as an alternative. Avoid letting your dog lick the nail immediately after. If bleeding doesn't stop after 10 minutes or if your dog shows signs of pain or infection later, contact your veterinarian. One small mistake won't harm your dog, but it may make them anxious about future trims.
How can I help my anxious dog feel comfortable during nail trimming?
Desensitization takes time but works. Start by letting your dog see and smell the clippers without using them. Reward calm behavior with high-value treats. Next, touch the clippers to their paw without trimming. Gradually progress to holding their paw and making the trimming motion. Use clicker training paired with treats to build positive associations. Most dogs show significant improvement after 4 to 6 weeks of consistent, gentle practice. Never force a trim; patience builds trust and makes grooming easier long-term.
This article was written using GrandRanker